2024 User Interface Trends

Every year sparks a new series of trends in design, some evolving from the previous years and others forming anew. As the years progress, we see increasing improvement in user-focused applications. User Interface (UI) is the design and organization seen visually on a website. In 2024, these UI trends will aid designers in creating immersive, user-focused applications:

Dark Mode

Websites and applications are adopting darker color schemes to fit the new dark mode trend. Dark mode is a light-on-dark color scheme that can reduce eye fatigue and aid in usability and visual accuracy. This is mentioned in research found in “ACM Transactions on Applied Perception,” but it also points out environmental lighting plays a hand in the user’s preference. Dark mode also aids in consuming less battery, with research by Pranab Dash and Y. Charlie Hu at Perdue University published in “MobiSys ‘21: Proceedings of the 19th Annual International Conference on Mobile Systems, Applications, and Services.” Dark mode isn’t limited to just black or dark grey; it includes all colors but on their darker scale. Gradients, glowing effects, and highlights can add interesting details to a dark-mode-themed design. It is often incorporated into an option where a user can turn it on or off depending on their preference or environment.

AI

Artificial Intelligence (AI), human-simulated intelligence of machines and software, has been becoming increasingly widespread and closely watched by the public, calculating what AI’s next move is. For the UI experience, it will bring a more customizable interface. AI will provide designers insight to make more informed design choices and help designers provide more user-centered designs supplied by data. It uses insight from the user to adjust and allow customization catered to the user’s habits or choices. Generative AI also provides a helpful tool for designers as they can use generative images to cut time in some designing phases. AI can help designers offer more personalized, automated, and accessible applications.

3D Design

3D Design choices will be an element that grows to other varieties of applications outside of gaming and e-commerce. This design element focuses on lighting, shading, texture, and layers to build depth in a design. The 3D design will provide visual depth to the application, allowing for a more immersive design. Some elements that may take on a 3D effect are icons, backgrounds, images, and more. Minimalism compliments this design choice to prohibit the design from looking overly cluttered.

Animation

Animations are another trend heading into 2024; they are visual elements where some items will have movement, whether through a click or happening as the browser is opened or scrolled to the area where it is located. Animations can be integrated into micro-interactions, icons, and other elements throughout a design. When you click on a button or element on the page, movement can be added, showing the user it reads the click or interaction like a bounce. Animations can provide both functional and decorative approaches, but it is necessary to have a balance between them. Animations can aid in usability and accessibility, influencing user decision-making and indicating relationships between elements. It also allows for interactions with physical objects. Animations can tell the user it has read their action and it is being executed.

These are some of the many trends projected to grow in 2024; some may have been seen last year but have continued into this year’s trends. These trends may not fit every brand, but some elements can add exciting detail if they are something that fits your brand. When considering incorporating trends into your website, one important factor is your users, what they might like, and how they will interact with the new elements. We are always excited to see these new trends and how they will shape web design in the future.
400 North Board of Realtors


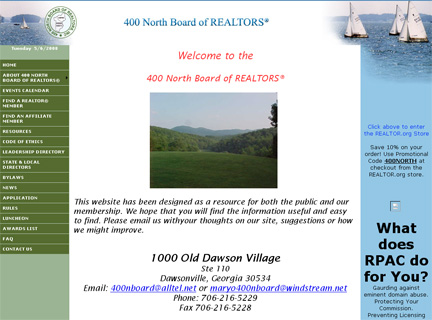
4nbor_beforeThe 400 North Board of Realtors have a large professional organization and major communication needs--but their site did not match the professionalism of the organization and they were unable to make timely updates.

Not only was the site out-dated, but other organizations were passing them by in terms of tools available to help their members, and enabling member-to-member recognition and communication. As an educational association, the 400 North Board of Realtors needed a little schooling!


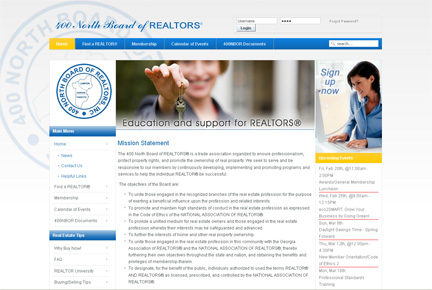
4nbor_afterAfter a thorough proposal and evaluation process, the 400 North Board of Realtors chose 3by400 as their partner of choice. They could easily see the benefit of Joomla! and teaming with a group that had significant experience in developing solutions.

With the new 400 North Board of Realtors site, members can quickly see what new educational events are occuring and sign-up online. The internal administrator is able to easily make updates to the site--and does so frequently. In addition, the association now gathers dues with an online membership management tool that has made the process more effcient and improved the member experience.


See The 400 North Board of Realtors site - www.400NorthBoardofRealtors.org

Adapting to Change with Online Learning: Part 1

There’s nothing like a global pandemic to change not only the way you do business, but the way you live.

With the advent of COVID-19 and continued social distancing efforts, the days of teacher-led business classroom training quickly became a thing of the past. With many employees working from home, using ZOOM for meetings and training rapidly gained popularity. As an emergency measure, substituting the classroom with video conferencing connections worked well, but after 19 months, many companies are replacing emergency measures with more permanent solutions for online learning.

Why Use Online Learning?

When done correctly, using technology for remote online learning has some significant advantage over traditional classroom training:
  • Consistent material delivery
  • Reduced delivery cost
  • Reduced attendance cost
  • Increased market reach
  • Student convenience
  • Improved reporting
  • No travel required
  • Opportunity to create private-label certifications
Along with these advantages, it is also important to consider costs and limitations:
  • Investment in technology
  • Investment in content development
  • Support for students in a wide variety of environments

What is Online Learning?

Online learning can be as simple as a library of “how to” videos on a YouTube channel and as complicated as a custom-built environment with specific prerequisite-driven paths and multi-tiered completion processes.

Typically, a well-developed Learning Management Systems (LMS) offers multiple forms of training material (written, graphical, audio, and video) divided into short lesson segments and organized by topic. At the conclusion of each lesson, the student is presented with a short test to determine their success in learning the material. In many instances, students who successfully complete training may be rewarded with certificates or badges.

The LMS should track each student’s progress and offer reporting on student activities, overall course participation, and completions.

Some learning environments require payment for courses, or protected access dependent upon conditions or prerequisites, such as being a registered client. There are as many ways to protect training content as there are topics, so understanding what you need for your specific environment and goals is key.

Getting Started with Web-Based Training

Prior to jumping into a new LMS, it is important to develop requirements, which simply means determining how things should work within your learning environment. Be sure to consider the environment for students as well as for those creating and managing content.

Although there are many options to consider and decisions to be made, here are a few to help get started:
  • What are the main topics or pathways of training?
  • How many courses within each pathway, and lessons within each course? Keep in mind that 5-7 minute “chunks” are optimum for online learning.
  • Do you have the resources to develop multiple training formats, such as diagrams, infographics, written documentation, demonstrational video, etc.?
  • Are you providing training for a third-party’s process or product, or your own? If so, are you licensed to do so?
  • Are you offering a certification? Is it a private certification or a third-party certification? Are there any permissions or fees involved in licensing?
  • Are there any prerequisites for your courses or certifications? Are they knowledge-based, or experience-based?
  • What behavior is expected when a student completes a lesson, course, and pathway?
  • Can students retake courses or lessons multiple times before or after testing?
  • Can students take or retake tests without reviewing lessons?
  • Will time limits be applied to the lessons, courses, and pathways, or is it self-paced?
  • What is the escalation path if a student challenges the results of a test?
  • Will all training be pre-recorded (canned) or will instructor-led sessions be provided as well?
  • Will students pay for online training? If so, is it based upon each path of study, for a specific time period, or some other mechanism?
  • What security measures will be in place for registration?
  • How will student accounts be managed and supported?
Once decisions are made regarding LMS requirements, tools can be evaluated for planning and implementation. Our next blog post will go into platform selection and the launch of online learning.

As daunting as implementing online training may seem at the onset, with a bit of preparation, some thorough evaluation, and some dedicated work, it is a feature that can yield amazing return on investment. If you are ready to explore a learning management system for your web environment and are looking for an experienced team that is focused on your success, contact us.

Adapting to Change with Online Learning: Part 2

In last week's blog post, we provided an overview of online learning, or Learning Management Systems (LMS), and considerations for developing one for any organization. This week, we will focus on content methodology, choosing the right tool, and launching web-based training.

Find the Right Solution

Determining the best method for implementing the best method for web-based learning depends heavily on any existing website and the technical level of those creating, entering, and maintaining content.

There are third-party Software as a Service (SaaS) offerings available. If deployment of the online learning solution is a critical and immediate need, SaaS may be a good approach, but keep in mind that it is unlikely to find a 100% match for defined requirements. Learn more about other potential SaaS issues here.

Any website built on solid CMS foundations, such as WordPress or Joomla, have several LMS options readily available. There are also platform independent, open source options like Moodle, that are highly sophisticated and can be customized for almost any need.

In addition to the baseline LMS, it is also important to ensure there is a method for accepting, managing, and resolving help requests from students. Sometimes that help will be related to the operations of the LMS itself--"how do I..."--and other times, the nature of the requests will be specific to the topic of the training. This may also be a good time to consider a simple ticket management system, and make sure resources are available to keep it humming.

This is a good time to contact a professional web design/development team. Their experience can help achieve a solution shortlist quickly and be an essential part of budgeting the timeline and cost of an LMS implementation project. Their experience with LMS environments will help avoid surprises and wasted resources during implementation.

Planning and Preparing Content

As in all websites, content is king, and this is particularly important for online learning systems.

If content already exists for previous classroom training, it will need to be refitted for online delivery. This can include written text, audio, and video, and using a mix of these not only keeps things interesting for the viewer, but also accommodates multiple learning styles. If possible, provide exercises throughout the lesson so that students can apply the concepts they have learned.

If video is being presented, make sure that it is concise and well-produced. If the video is live action, or a combination of images (slides) and an instructor, be sure to consider:
  • Lighting
  • Voice amplification
  • Sound quality
  • Appearance of the presenter
  • Clarity of the presenter's delivery
  • Any interruption or pause in the content presentation
  • Labeling or embedded graphics
In a content environment that includes a significant percentage of video content, this may be a good time to consider the services of professional presenters, videographers, and editors.

Although format is important, the amount of time required to complete a lesson within a course is crucial for student success. Lessons should take no more than 5 to 10 minutes to complete and should conclude with a brief, multiple choice quiz to ensure that the student understands primary concepts.

If training content and testing is part of an overall certification program, any non-training related credentials or qualifications should be clearly stated to the student prior to them starting the training. Some examples are work experience, other prerequisite training, and work products (documentation). If additional requirements are handled in a manual review process, it is important to make sure the student is able to set the proper expectation for that process and its overall timing.

With so many important features of the content, be sure to not overlook the fact that the materials presented are created in a way that an average student will actually learn the course material, and that the course material is worthy of being learned. In other words, do not expect a successful LMS environment without thoughtful consideration of topics and content.

Prepping and Launching Online Learning

Once the LMS is in place with shiny, new content in progress, plan the launch date.

Testing is crucial to a successful launch. As a stakeholder, be sure to participate personally in the testing. Other employees and trusted clients or business associates are also testing candidates. The goal is to ensure that the training environment is easy to navigate and allows the student to focus on the material, rather than the tools providing it.

Testing is also a great time to gather helpful tips and a set of frequently asked questions for your students--designed to make things as easy as possible for them and reduce future support for them.

Verify that the server and infrastructure supporting the LMS can handle a significant uptick in activity in terms of bandwidth and processing power. There’s nothing worse than launching a great new website feature, only to field calls and emails from dissatisfied users complaining of delays and unavailability.

Promote to viable students as far as thirty (30) days ahead of your launch date. Create urgency for attendees by providing a discount coupon (if paid training) or a reward for signing up, such as a limited number of gift cards. If your site contains a blog, write about the new LMS. Advertise it in site banners or modules. Send a special message to your emailing list. Generate excitement through social media accounts. In short, stick to the plan and get the word out!

As daunting as implementing online training may seem at the onset, with a bit of preparation, some thorough evaluation, and some dedicated work, it is a feature that can yield amazing return on investment. If you are ready to explore a learning management system for your web environment and are looking for an experienced team that is focused on your success, contact us.

Bear on the Square Mountain Festival


Bear on the Square - BeforeThe Bear on the Square Executive Committee liked their old site. Only problem was that they had a difficult time getting the site updated and making it really look the way the festival feels to performers and attendees. Although the site was appealing, it was difficult for the Communications Committee to keep updated on a regular basis and maintain the styling so the site could remain professional. In addition to the update issues, the site just wasn't as hip as the event.
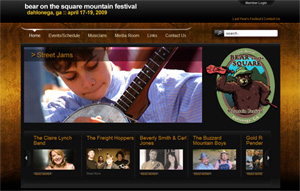

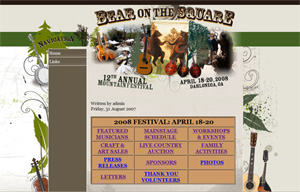
As the new official web sponsor for Bear on the Square Mountain Festival, 3by400 spent significant time determining what would ultimately be tbots_afterhe cool, new skin of the new site. In addition, the entire Communications Committee was trained on updating the tool using global CSS so individual content styling was eliminated.


Additionally, 3by400 has provided tools that truly showcase musicians through images and a media players so future audiences can get the true feel of the event. A colorful flash gallery on the home page helps relate the experience. The latest update, a calendar, simplifies the process of publishing the ever-growing calendar of events.


See The Bear on the Square site - www.BearOnTheSquare.org

Doing Things the Joomla! Way

Joomla logoWe've now been working with Joomla! for over ten years--since its inception in August 2005. In that 10 years, we have worked with hundreds of web sites and learned a thing or two. One of the tremendous advantages of Joomla! is the vast array of third-party extensions - components, modules and plugins - available to add almost any functionality you can think of to your web site. On occasion, a client requires functionality that cannot be provided by an existing Joomla! extension, so what do you do when Joomla! or one of those extensions doesn't do everything you need?


There are many developers out in the world and even those who know SQL and PHP, the foundation upon which Joomla! is built. However, if you hire a developer to add functionality to your Joomla! site, their ability to work within the context of Joomla! is critical. We have cleaned up many a site in which a well-meaning developer thought that changing core Joomla! code or the core code of a major extension was the right approach. The problem becomes evident the next time you need critical updates to Joomla! or the modified extension. In a worst case, you may not be able to perform the updates, and if you can, you will have lost the customizations.

Although less disasterous, we have seen some instances where the simple beauty of standard functions like menus and modules were hard-coded, rendering maintenance and updates impossible for the average administrator.

Why do they do it? Because they simply don't know the Joomla! Way.


What is the Joomla! Way

The Joomla! Way is focused on making updates and additions to the site as simple as they can possibly be, using standard tools like the Menu and Module Managers in their native mode. Keep it core Joomla! as much as you possibly can and only extend when necessary...and it will almost always be necessary for sites with any degree of complexity.

Another key element of the Joomla! Way is that where new functionality is required, search diligently through the Joomla! Extension Directory(JED) and keep an open mind. Just because an extension was originally designed for one purpose doesn't mean that is its only application. Think outside the box and consider that by re-labeling fields and changing naming conventions, using the Joomla! Language Manager, an existing extension may fit perfectly for your need. Also, be sure to vet the developer before you select their extension. The JED is a great source because the Joomla! Foundation performs significant review before extensions are allowed in the directory, but it is still a good idea to look at recent reviews and product demos.

The most crucial aspect of the Joomla! Way is that if you cannot find an existing extension to meet your needs, or need modifications to an extension, find a developer who has Joomla! development expertise and can demonstrate that proficiency through development examples.

The proper way to customize most extensions is through plugins and/or modules, and those should be enveloped in an installer package. If you can't load it through the standard Joomla! extension installation, it has not been created in the Joomla! Way. If a developer says they must make changes at the SQL level or modify core Joomla! files manually, they are not observing the Joomla! Way. If you are told not to update Joomla! after a customization has been made, it was not the Joomla! Way.

Even Styling has a Joomla! Way

Since most site administrators are not necessarily well-versed in HTML (nor should they have to be for Joomla!), inline styling and customization should also be held to a minimum. If styling changes are required, they should be applied globally through a custom CSS or an SCSS override that extends template CSS/SCSS and is not over-written when the template is updated. If you are using a template provider who does not allow for customizing the CSS/SCSS using a custom override, they are probably not doing things the Joomla! Way.

Who Does Things the Joomla! Way?

We do! And there are many other professionals around the world doing things the Joomla! Way! You can find some of them in the Joomla Resource Directory (JRD), and although there is some work involved in being listed in the JRD, there is no test or performance requirement to prove that a resource is working the Joomla! Way.

Diligence at the beginning of your search will help ensure the value of your investment over time and the long-term ease of use that you should be able to demand of your Joomla! site.

If you want help with a custom project or anything Joomla!, please contact us. We promise to always do it the Joomla! Way!

Domains Held Hostage

For some companies, web sites are a nicety—they exist as a brochure but don’t really drive business. Other companies depend upon their web sites for sales and new client generation to such a large degree that their livelihood is dependent upon their web site.

Over the past five years, I have helped rescue scores of domains for helpless consumers to whom the Internet and their web sites are somewhat of a mystery. I still receive frequent calls that range from “my domain is registered in the web design company’s name” to “the registrar says I have to pay $180 to transfer my domain.” Registration is the very foundation of your web site lifecycle, so it’s important to choose wisely. 

Much like me going to a dishonest auto mechanic, many customers can be easily tricked by unscrupulous web designers and feigned domain registrars, or simply left in trouble if a company in their link of site ownership becomes unstable. This article should help you make sure that your company’s web site is not in jeopardy of being held hostage.

gi_domains

Hosting Is Not Domain Registration
Many consumers make the mistake of only searching tools like www.findmyhost.com to locate and engage a domain registrar. This site and others like it relate to hosting your site and do not specialize in domain registration.

Hosting service is the provision of storage space (like your hard drive) on the Internet. It is the second layer of launching a web site, built upon the foundation of domain registration. So, registration and hosting are two separate functions—don’t get them confused. For the most part, hosting companies are middlemen. The problem with using a middleman—a third party that performs bulk registrations through an official registrar—is that accounts are generally set up in the third party’s name, giving you no direct access to your domain record. These firms use accredited ICANN registrars to process your order, but do so behind a closed curtain so the transaction is hidden from you. The hosting company has generally become an affiliate to the registrar, meaning that they get some type of reward for setting your domain up with that registrar. I’m not saying affiliate programs are wrong, but the reward structure can sometimes motivate hosting companies to choose the wrong registrar.

Use Legitimate Domain Registrars
Not every company offering $5.00/year domain registration is an official ICANN registrar. ICANN (Internet Corporation for Assigned Names and Numbers) is a non-profit, public interest group that oversees the global domain name service. In ICANN’s own words, it is “responsible for managing and coordinating the Domain Name System (DNS) to ensure that every address is unique and that all users of the Internet can find all valid addresses. It does this by overseeing the distribution of unique IP addresses and domain names. It also ensures that each domain name maps to the correct IP address.

“ICANN is also responsible for accrediting the domain name registrars. ‘Accredit’ means to identify and set minimum standards for the performance of registration functions, to recognize persons or entities meeting those standards, and to enter into an accreditation agreement that sets forth the rules and procedures applicable to the provision of Registrar Services.”* Say what?

Basically, they are the ones who make sure that companies are playing by the rules in terms of making the Internet continue to work as we expect. They also make sure that TCP/IP (the protocol of the Internet) addresses are not duplicated.

ICANN is the place to which end users can present claims of misbehavior for those registrars who have official ICANN accreditation. Business news is fraught with accounts of misbehavior, such as requiring additional, undocumented funds for transfers or disallowing the modification of the domain record.

Before you or your consultant registers a domain, go to www.internic.net/origin.html to see a list of accredited registrars by country. It is a good idea to register in the country in which your business is located. You should also perform some Internet research to find out any existing user claims against your selected registrar, but do so with caution. Some end users “flame” a vendor when they themselves may be using a wrong approach.

When you are evaluating domain registrars, be sure to choose one that provides full contact information (including a phone number) and a documented escalation procedure. About half the time you need support from your domain registrar, it will be an emergency situation. You don’t want that to be the time to figure out that there is a 24-hour response time on support requests or that their support is only available between the hours of 10:00am and 4:00pm PST. Know before you buy.

We use GoDaddy.com, which has been flamed by many past users. Our experience is that over the last 5 years, they have proven a reliable, fully compliant, accredited registrar with excellent support and business practices. Additionally, they maintain a reasonable price structure for domain registration and a great tool for managing multiple domains. And, no, my company is not an affiliate!

Own Your Domain
One of the perils of “knowing enough to be dangerous” is that it may appear that your domain is registered to you when it is actually registered to your hosting company or the web design company you’ve hired. To promote the concept of domain ownership with our clients, we typically walk them through the process of purchasing their domain name. We take the opportunity to answer questions and make sure the tremendous amount of up sell information does not mask legitimate registration options.

A credit card must be used with most registrars and it is important for you to use your own credit card so you know when and what charges are made in relation to domain registration. Once the process is completed, you will be sent an e-mail receipt and confirmation of the registration information, including your account name, so it’s important that your e-mail address is documented in the registrant section. These are important documents that should be retained as permanent records. Be sure to include the password you selected for your account as well.

No matter how busy you are, knowing that you own your domain is one of the most important steps to launching a successful site and maintaining control over what might be one of your most valuable assets. You should have a URL, a username, and a password that allows you to make any necessary changes to your own domain. You may leave this to your trusted consultant, but you should always know that you have access to this information…just in case. If you maintain control of this information, you will significantly reduce the possibility of being held hostage. 

To check ownership of your site, go to www.whois.com and enter your domain name. Even if the site is privately listed (so ownership information is hidden), the registrar of the site should be listed. Alternately, if you go to www.godaddy.com, type your domain name in the domain search, then click the “more info” button.

Stay Flexible
There is a delicate balance between registering your domain for permanence and flexibility. Unless you know that a domain will not remain a permanent asset, always register for at least two years. The best registrar today may not be the best registrar tomorrow, such as was the case with RegisterFly.com.Your ICANN-accredited registrar will notify you when your domain is about to expire, so you have the opportunity to evaluate if they were the right choice for you. If so, re-up for two more years. If not, go to your newly selected registrar and start the domain transfer process. 

How Do I Ransom My Domain?
If you are in a situation where a hosting company or a past consultant has left you powerless over your domain, you should start with finding out where the site is registered (see above “who is” steps). Contact the registrar to find out what their specific process is for reclaiming your domain. For many registrars, the process consists of proving that you are a legitimate agent of the company represented on the site—yet another good reason to make sure your site is truly representative of your company. You may not feel comfortable faxing a copy of your driver’s license on official company letterhead to the registrar, but that may be what it takes. Whatever you are asked to send, make sure you know exactly why the registrar requires that information. If other sensitive information on that document is not required, mark it out. Don’t allow a bad situation to turn worse by exposing personal information unnecessarily.Make sure that the registrar changes the registrant e-mail address listed for the domain to match your current address. Sometimes, doing this is all that’s necessary for them to send a password reset that allows you access to your site. 

If you decide to transfer your domain to another registrar, make sure that you retain the DNS settings so the hosted portion of your web site is not lost. Another bad-to-worse situation is saving your ransomed domain name only to lose the content of your web site.

If your domain is currently being held hostage, hopefully, these steps will help you free it and become master of your domain. Otherwise, be sure to find a reliable, trustworthy professional who can help you on a web rescue.


*From www.icann.org/faq/

This article used with permission from 400 Edition, Inc. It is unlawful to use this article or any portion of it without the expressed permission of its author. This email address is being protected from spambots. You need JavaScript enabled to view it.

Entrepreneurial Endeavors

Moving from idea to implementation

In a month, 3by400 receives at least three or four calls from people who have the "best idea for a new web site". About 1% of them really do have a great idea for a site. The rest, unfortunately, failed to Google their thought before running headlong to web site design. That 1% is worth the others...so how do you decide if your concept is truly a great new entrepreneurial idea?

Put Pen to Passion
Like any good idea, the first thing you should do is write it down. You don't have to come up with a clever name right now, nor do you need to worry about details. Just write down your ideas, then set your summary aside and look at it again next week, or at least tomorrow. Did you sleep last night? Does it still excite you? If so, you probably have an idea about which you can be passionate. If it becomes an actionable plan and grows to a business, you will need that passion to get you through the trying times.

newideas

Hobby or Business?
Some people are extremely passionate about their hobbies. I sing in a barbershop quartet, and although we do perform paid gigs sometimes, it is still a hobby...and I am very passionate about it. Just because you can earn some revenue doesn't necessarily make your idea business-worthy. A business will provide goods or services that can be purchased by a distributor, reseller, or consumer. Is there a market for your idea? Can you identify revenue streams and expenses? What would you have to do to generate enough revenue to provide support for you or make it a sustainable concern?

Unique or Better?
Your idea doesn't really have to be new and unique to be successful, but if someone else is already  executing your idea, they may have a competitive advantage due to an established market, proven processes, and a brand. If you can do it better, faster, or cheaper, though, you can still find success.

We have seen many successful ventures spawn from "re-application"--that is taking an idea from one market to a different one or focusing on a very niche market. For example, job boards have been available online for decades, but many companies have found success by focusing only on specific careers, such as healthcare as an audience, or veterans as a workforce pool.

This last example brings another potentially better approach--rather than focusing on the demand end of the economic equation, focus on the supply end, or vice versa. 

Google It
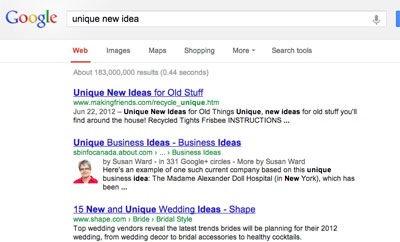
Now that you have had some time to carefully evaluate and qualify your idea, spend some significant time using Google to look for businesses that may offer your planned service or product. To facilitate this activity, make a list of words that describe your idea in several different ways, so that your searches can be complete. For example, if you have an idea to invent a "tomato slicer", you would want to search for "vegetable cutter" also...and you might want to add "Ronco®" to that list, too.

The other advantage of googling your idea is that you can glean new ideas and terminology along the way by viewing the sites from your search results. Even if you find that your original idea is not quite as original as you thought, this research may birth new angles that you haven't yet considered. Consider it part of your education.

Time consuming? Yes. Tedious? Maybe. Worth it? Absolutely!

unique idea

Pay the Piper
Unless you are a renaissance person, you will probably need help in some area of your idea to convert it to a working business. Make a list of all of the tasks and responsibilities required, both for daily operations and more long-term or strategic items. It helps to break these up into categories like daily, monthly, quarterly, annually, and as-needed.

Next, highlight the items that fall within your skills and talents--honest assessment is key. You may wish to make these selections yourself, then have someone who knows you well, such as a spouse, parent, or very good friend, give you an assessment of your ability in these areas, just to keep things real. They may also be able to uncover some items that you haven't highlighted that are still in your wheelhouse.

Take your list of "can do" items and place an "x" next to the items for which you may have the skills and talents, but may steal your joy in life. Finally, analyze the volume of activities by the timing category. If you would have to spend exhaustive hours on purely operational items, you should probably add more "x's" to your list!

Now that you have a list of responsibilities, as flawed as it may be due to unknowns such as the volume of business you may be handling, you have a place to start for finding the right kind of help. Many times, you may be able to perform all required tasks until the business yields sufficient activity to demand assistance, but only you can decide what price you are willing to pay to get that help.

Make Your Plan
Now that you have moved from the "Ive got a great idea" stage, develop a plan. You can use your original "ideas" document and your Google research as a starting point. Don't get so focused on details within your plan that you can never finish it. Here is a good outline of what you might want to include in your plan.

Even if you can't round out all of the outlined areas, you will need some documentation--frequently referred to as a business plan--to gain traction with others and, frankly, to remind yourself of your goals. Don't get caught up on that "business plan" name, though, unless you are expecting to approach investors. The goal is communicate what you intend to do and how you intend to do it.

Part of your plan should include timing. Having a timeline will motivate most people into action and helps you organize the priority of events associated with launching your plan, thus finding dependencies like drafting your requirements for a web site before you go about receiving quotes.

Protect Yourself
If you are going to discuss your idea with others, you should probably have a non-disclosure agreement handy. When signed beforehand, this instrument creates penalty for anyone who discusses your plan with others or tries to nab it for themselves. It also keeps things on a professional level and lets potential collaborators know you are serious about your idea.

If your idea includes something that you can patent, register for trademark, or copyright, and you are willing to make the investment, do so. Just know that you could be investing in something with no return at this juncture.

The Right Resouces
The advantage of bringing others into the mix early is that you will have the opportunity to collaborate. An attorney will likely uncover areas of risk that may not be evident to you; an excellent web developer will know how to automate tasks that can help you be more profitable; and a human resource professional can probably help you ensure that potential candidates are a good fit. The minute you begin to think that your idea can't be improved upon is probably the minute that you are setting yourself up for failure. Stick to what you know and surround yourself with others you can trust (and who have signed your non-disclosure agreement) who do the same.

We Want In!
If you find that you really DO have an idea that has legs, contact us! We have significant expertise in providing technology visioning and helping define requirements that can result in an efficient plan for moving your idea into reality. We live by the spirit of partnership with our clients.

Here's to your success!

Get the Best Results from LogoTournament.com

One of our favorite tools on the Internet--you know, one of those where you slap your forehead and say, "Doh, wish I had thought of that!"--is Logo Tournament. The concept and functionality are excellent. It is the definition of free enterprise on a global level! Kudos to Tyler and his team for creating an environment that allows a fairly succinct managment tool for a very difficult process. The quality of designs is nothing short of spectacular, as long as you know how to make the tool work for you.

The basic concept: you, the Contest Holder, develop a creative brief by answering a series of questions; you set a prize for the winning logo design; designers from across the world submit entries to your contest; you review, rank, and make modification requests to the designers; you award the prize to the winning entry designer; and finally, the winning designers delivers final files for your use. All design work must be original, so the Contest Holder has full copyright to their logo.

Getting the most out of Logo Tournament takes a few trial runs, but unless you are a design company, you probably need only one logo! Kind of an oxymoron of sorts, so here are a few tips. It's long but worth the read to get the most for your money. If you're already overwhelmed, we can usually help you manage the process--a Logo Tournament Sherpa of sorts--for about $300 over the cost of your logo prize, so contact us!

  • Don't scrimp on the prize. Even though you can get a decent logo for $275, consider that most major ad agencies would charge you at least $1K and you might get 10 possible choices (mostly from one or two designers). On Logo Tournament, you will received scores of possibilities from a wide variety of designers--all with different points of view. This is the real value of Logo Tournament. Consider making the prize $500 (at least), and you'll get hundreds of entries.
  • Set your contest for the shortest possible timeframe. Trust us...you won't want it to drag out for even two weeks. If you don't get the results you want in a week, you can always extend the contest. If you follow the strategy contained within this article, you'll get plenty of great possibilities.
  • Only set your contest to private if you are launching something new in a highly competitive market. If it is private, you cannot enlist other opinions by providing the contest URL to other associates--a private contest requires that the view have a username and password.
  • The creative brief should be completed very thoughtfully. BEFORE you sign up, and are staring at the creative brief, it is wise to go to some existing contests (current and complete) and compare how creative briefs are filled and the results they receive. This is your primary way to communicate with designers, so keep things clear, concise, and concrete.
  • Avoid using local slang. Always keep the cross-cultural environment in mind.
  • Any colors described in your creative brief should be supported with RGB or CMYK color values. By providing color values, you will save yourself and the deisgners a lot of misfires.
  • If you start receiving entries that don't convey what you are really seeking, you should consider changes to your creative brief that help clarify your needs.
  • If you change your creative brief, post a note to designers in the comments on the front page of your contest--something like,"We have tried to clarify our creative brief, so please review it prior to submitting or re-submitting entries. We will not consider copy-cat entries, so please keep it original!"
  • Read the first comment on your page...one of the moderators will give you tips on a successful project. This is good advice.
  • Rank and comment DAILY.
  • Remember that many of the designers will be in a significantly different time zone than you.
  • Enlist the opinons of others, but don't second-guess your gut instinct. As long as your contest isn't private, you can allow anyone to look at your contest entries by giving them the link www.LogoTournament.com/contests/your_contest_name.
  • When you see a designer copy-catting (submitting something overly similar to another design), even if you like it better, you will earn the respect of designers if you place the copy-cats in "Not Interested' and post a note for that entry telling them that their design is too similar to #xx, whichever entry number they copied. You can always take ideas from the copy-cat that you liked and send a note to the designer of the original asking for a modification of the elements you like in the copy-cat.
  • As in all things, find something nice to comment upon for each designer (not necessarily each entry), even if it is, "Thank you for taking the time to respond to our contest, however, we do not feel that your design captures the spirit of our organization." Designers in LogoTournament cross all cultures, and politeness should be observed across the board.
  • Just expect that when you have 24 or fewer hours left on the contest, you will be BOMBARDED with entries. It's just the way it works because of the copy-cat issue and the number of tournaments that exist.
  • Be sure to provide feedback on the individual design by clicking "Comment" under that design, and refer to the entry number within the text of your comment. Be as specific as possible in your feedback. For example, "That shape is not a common icon for US audiences. Do you have other ideas that might be more intuitive for Americans?" rather than "What the heck is that?"  (joking, but only a little bit)
  • If a designer gets impatient with you, put them in "Not Interested". If they are impatient during the contest, you may have issues with them in the final file delivery. They're likely just in it for the money. If they are abusive in any way, log a request under Support.
  • Some designers will pull their entry if you place them in "Not Interested", so be sure you really mean it when you place them there. In the ranking screen, you can drag the unranked designs into whatever order you choose, to clean up your view, rather than place them in "Not Interested".
  • If a designer asks you a question in the comment of a logo that helps clarify your needs, be sure to post the question and answer in the front-page Comments, so everyone gains the same understanding.
  • You can ask a designer to refine an idea...like, "Can we see that with blue instead of green?" or "We like the concept, but the placement of the graphic makes the logo vertical rather than horizontal. Can you produce another option?". They are happy to revise, but make these requests thoughtfully and don't waste their time.
  • When the contest ends, you have 7 days of judging, so don't hurry the decision. During that time, you can re-rank at will. You can also request modifications from any design that is in 1st place, so you might have to re-rank if you have a few that require refinement.
  • If your contest goes into judging and you have several potential winners, be sure to post an entry on the front comment page that lets them know that you are still trying to decide and ask them not to remove their entries.
  • Before you select a winner, be sure to rank at least the top 10 to different designers, especially if the designs are only minor changes, like color or font face. Our approach has always been to have one ranked entry for each designer, then put the remainder in "Not Interested". From the designer's point of view,the top three entries win "cups", or a higher level of points; and all subsequent ranked entries receive points for their profiles. Leaving a non-winning designer ranked simply honors their work by awarding them points.
  • When you have selected a winner, we recommend sending them a private message asking for the following formats (in addition to the EPS version you will receive). These are just a few clicks of a button when the designer has the original file up: Full AI version compatible with Adobe CS/2; Grayscale version in EPS; CMYK version in EPS; RGB version in EPS; High resolution, CMYK version in JPG; High resolution RGB version in JPG.

Enjoy this great tool!

Good Website Images vs. Bad Images

If you've been our client long, you know we emphasize that good images for your website show real people doing things that the website visitor would like to be doing. If such images aren't available yet, we'll put in a stock photo image. The latest usability results show.....


that there's a VAST difference in interest generated between real photos and stock images. This article from from Jakob Nielsen (THE man in web usability) shows that some stock photos get completely ignored by the user. Take away: we need to work hard to keep our images updated as well as our text. Get that camera out and start taking pictures.

Helping People Find Your Web Site

Most business owners know that a print ad is only as valuable as the circulation of the publication, and a radio ad is only as valuable as the station’s listenership. But somehow these same people think that just having a website is sufficient. A website is only as valuable as the number of interested parties viewing it. Today we’ll take a look at some ways to get more people to view your website, making it more valuable to your business.

First, ask “what group of people do I want to serve with my website?” Is it prospects, existing customers, wholesale customers, retail customers? Are they male, female, married, single, 18 years old, 35 years old? Where do they live? If you’re a traditional retailer, just think about the faces of your best customers.

Now that you have focused on who wants to find your website, put yourself in their shoes. How would they find your website if they didn’t already know about you? They’d probably use a search engine. Now comes the hard part: what words would they type into the search box? Remember, they don’t know about your website or your company’s name. Maybe you’re too close to this process to be objective. Ask family, friends, customers, anyone who’s familiar with your services, what words they’d expect to search for to find your website. You might be surprised by their answers. Now try those words in your search engine of choice. If your website is already at the top of the list, that’s great! Odds are, though, that your website isn’t on the first page of results. That’s not so great. But look at the sites that are there. These are sites competing for your customers, some you may know about, some may be new to you. It’s now time for a reality check. You may never be able to get top placement on some search terms. At 3by400, we realized that we’d never get to be on the first page of search results for ‘web design’ (out of 200 million plus results), but we did have a chance of ranking well for ‘north georgia web design’ (about a half million search results). So choose these search terms wisely. After weeding out search terms that are too broad or don’t exactly match you, you’re left with the search words to concentrate on from here on out. These we’ll call ‘key words’ to follow the industry vocabulary.

Now look at your web pages. Where are these key words on your page? If they don’t appear, you’ve got some rewriting to do. Why? Because you can’t fool the search engines. They aren’t going to report your page as a possible match for a search on your key words if your pages don’t contain them. If the text on your website is about cat accessories, it will never come up on a search for ‘dog collars.’ So start rewriting your web pages to work your key words into the conversation. Important places to put them are in the page title and section headings. Search engines regard these as the most descriptive parts of the page. Next, create high-quality, unique page content using your keywords. Notice the word ‘unique.’ You can’t just copy and paste information from other sites and expect to rank well in search results. Search engines work hard to weed out duplicate content that’s presented to the searcher. If your content is identical to other content on the web and several months newer, guess who gets weeded out?

After doing all the above, your site still might not rank well. Why? I could either go literary and say ‘no web site is an island, entire of itself,’ or go pop-culture and say ‘I get by with a little help from my friends.’ Both are true. An important factor in deciding how important your web site is, is how many other sites link to it. The search engine programs that look at your web site can’t understand the meaning of the words on the pages to decide how good your information is. The search engines rely on your peers to do this for them. If a lot of other sites are linking to content on your site, then the search engines figure that you have good content and therefore your site is important. If nobody is linking to anything on your site, the search engines figure that your content is fairly forgettable. But all links to your site are not created equal. Links from other high-quality sites with lots of visitors and similar content will count the most. Links from poor-quality sites with low traffic don’t pull much weight with the search engines. How do you get the people who run other sites to link to your site? You could send them email and ask, but that generally doesn’t do too much good. The best way to get people to link to your site is to provide high-quality, unique content. It’s often said in the world of the web that ‘content is king,’ and justifiably so. If you’re providing good-quality information that can’t be found elsewhere (without an obvious self-serving sales pitch), then people will link to your site.

After people find your content and start linking to it, then you could politely drop them a note to ask them to include one or more of your key words (remember those?) in the link to your site. For example, our key words at 3by400 were ‘north Georgia web design.’ Instead of having links on other sites that just said ‘3by400,’ we ask that the link read ‘3by400, a north Georgia web design team.’ It’s another avenue to use your key words to give the search engines hints of what your site is all about.

In a sense, ranking well on search engines is like getting a loan from a bank. Who will the bank give loans to without hesitation? Those who don’t need the loan. Which sites will search engines rank highly? Those that have a lot of traffic coming to them from other sites. In other words, those that don’t need the search engine ranking to generate traffic!

A couple of final notes: your customers and search engines won’t find your site if it’s not there. In other words, you have to have a web site and it has to be hosted reliably to be of benefit. The other element in ranking well and being found is time. The older your site is, the more weight it carries with the search engines. Lastly, I’m proud that I’ve written this much on this topic without mentioning the word “Google” or the acronym “SEO” (Search-Engine Optimization), even though that’s what the bulk of this article was about.

This article used with permission from 400 Edition, Inc. It is unlawful to use this article or any portion of it without the expressed permission of its author. This email address is being protected from spambots. You need JavaScript enabled to view it.

How Not to Do a Mobile Site

There are waves of charlatians that we see in the web industry: a couple of years ago there were SEO consultants, then there were Social Media consultants. I'm starting to see Mobile Web consultants make the rounds now. These people will set up a 'mobile friendly' version of your website at some other domain name like m.yoursite.com. This is the way things were done a couple of years ago for feature phones, not today's smart phones. In fact, Google specifically recommends AGAINST using a separate mobile version of your website. The modern way of doing mobile-friendly websites is just to put a mobile-friendly template on your Joomla site with some module tweeks and you'll be good to go. Please call us first before buying somebody's mobile-version-of-your-website snakeoil.

How to Add a Contact Form in WordPress

WordPress doesn't come with a contact form. You add one with a form plugin. The steps are about the same no matter which plugin you use. These steps are for WordPress 6.x and later.

Pick a form plugin

Well-known options include Contact Form 7, WPForms, Gravity Forms, Formidable Forms, Ninja Forms, and Fluent Forms. Some are free, some have free and paid versions, and some are paid only. Things to think about:

  • Does it save entries in WordPress, or only send email? Saved entries are a lifesaver when an email goes missing.
  • Spam protection: look for honeypot, CAPTCHA, or similar options.
  • Ease of use: drag-and-drop builders are easier for most people.
  • Is it kept up to date? Check the last-updated date and support forum.

Already have a form plugin? Use that one. Running two form plugins just adds more to maintain.

Install the plugin

  1. Back up your site.
  2. Go to Plugins > Add Plugin, search for the plugin, then click Install Now and Activate.

See How to Install and Update WordPress Plugins Safely.

Build the form

  1. Open the form plugin from the left menu and create a new form. Many plugins offer a simple contact form template.
  2. Keep fields to what you really need: usually name, email, and message. Every extra field means fewer people finish the form.
  3. Mark required fields.
  4. Set the confirmation message people see after they submit, like "Thanks, we'll get back to you within one business day." Only promise what you can keep.
  5. Save the form.

Set up notification emails

  1. In the form's settings, find Notifications or Mail.
  2. Enter the address (or addresses) that should get submissions.
  3. Set the Reply-To to the visitor's email field so you can hit Reply.
  4. Leave the From address as an address on your own domain. Using the visitor's address as the "From" often lands mail in spam.
  5. Save.

Put the form on a page

  1. Edit the page (for example, your Contact page).
  2. Add the form plugin's block. Click + and search for the plugin's name or "form." Some plugins use a shortcode instead, which you paste into a Shortcode block.
  3. Pick your form.
  4. Click Save or Update.

Test it

Submit the form yourself. Check that:

  • You see the confirmation message
  • The email arrives (check spam too)
  • The entry shows up in the plugin, if it saves entries

Emails not arriving? WordPress sites often need an SMTP plugin, or your host's mail settings, to send mail reliably. See Domain, DNS, and Business Email Basics: Who Owns What.

Keep spam out

  • Turn on your form plugin's honeypot or anti-spam option.
  • Add a CAPTCHA (like Google reCAPTCHA or Cloudflare Turnstile) if spam keeps coming.
  • Don't post your email address as plain text on the same page if you can avoid it.

Privacy

Contact forms collect personal details. Mention it in your privacy policy, only keep entries as long as you need them, and limit who can see them.

Related

Prefer we handle it?

If you'd rather spend your time running your business, our boutique hosting, available to our clients, including sites moved over from another host, takes a proactive approach to security and monitoring, with nightly backups, 24/7 outage monitoring, and ongoing core CMS updates.

How to brief a web designer so you don’t redo the project

Most website projects that stall or restart didn’t fail on design talent. They failed on the brief. Someone said “make it modern,” nobody wrote down what that meant, and three rounds later you’re paying to rebuild pages you already approved.

A clear brief doesn’t need to be long. It needs to answer a few questions before anyone opens a design file. Here’s what to bring, what to decide early, and a one-page checklist you can copy.

How to Change Menus and Navigation in WordPress

Using Joomla instead? See How to Change Menus and Navigation in Joomla.

How you edit menus in WordPress depends on your theme:

  • Block themes use the Navigation block in the Site Editor.
  • Classic themes use Appearance > Menus.

Not sure which you have? If you see Appearance > Editor, you're using a block theme. If you see Appearance > Menus, it's a classic theme. Some sites use a page builder or theme that has its own menu tools.

Block themes: the Navigation block

Open your menu

  1. Go to Appearance > Editor.
  2. Click Navigation to see your menus, or open the template part (usually the Header) and click the menu.

If you see a page list

A new Navigation block often starts as a Page List, which shows all your published pages automatically. To change items, select the Page List, click Edit in the block toolbar, then Edit again in the dialog. Note that new pages are no longer added automatically after that.

Add, change, and remove items

  • Add a page: click + (Add page) in the menu, then search for the page.
  • Add a custom link: click +, then Add block, choose Custom Link, and enter the URL.
  • Change a label or link: select the item and edit Text or Link to in the settings sidebar.
  • Reorder: select an item and use Move up / Move down in the toolbar, or drag it in List View.
  • Add a submenu: select an item and click Add submenu in the toolbar, or drag an item under another and slightly to the right in List View.
  • Remove: select the item, open Options (three dots) in the toolbar, and choose Delete. This doesn't delete the page itself.

Mobile menu

In the Navigation block's settings, Overlay controls when the menu collapses into a menu icon (Off, Mobile, or Always).

Click Save when you're done.

Classic themes: Appearance > Menus

  1. Go to Appearance > Menus and pick the menu from Select a menu to edit.
  2. Add items: in the Pages, Posts, Custom Links, or Categories panes on the left, tick what you want and click Add to Menu. (Use Screen Options at the top to show more panes.)
  3. Reorder: drag items up or down.
  4. Make a submenu: drag an item under another and slightly to the right.
  5. Edit an item: click the arrow on the item to change its Navigation Label, or click Remove.
  6. Choose where it shows: under Menu Settings > Display location, tick the location.
  7. Click Save Menu.

Related

Prefer we handle it?

If you'd rather spend your time running your business, our boutique hosting, available to our clients, including sites moved over from another host, takes a proactive approach to security and monitoring, with nightly backups, 24/7 outage monitoring, and ongoing core CMS updates.

How to Change or Customize Your WordPress Theme (and When to Use a Child Theme)

Your theme controls how your WordPress site looks: layout, colors, fonts, headers, and footers. You can switch themes, tweak the one you have, or use a child theme for deeper changes. These steps are for WordPress 6.x and later.

Block themes vs. classic themes

WordPress has two kinds of themes, and where you make changes depends on which one you have.

  • Block themes (like the default Twenty Twenty-Five) are customized in the Site Editor: Appearance > Editor.
  • Classic themes are usually customized in the Customizer: Appearance > Customize. Some classic themes and page builders have their own settings screens too.

If you see Editor under Appearance, you have a block theme. Depending on your version and theme, the Appearance menu may also list items like Patterns or Fonts.

Before you switch themes

Switching themes changes more than looks. Menus, widgets, and some page layouts may need to be set up again, and features built into the old theme can disappear.

  1. Back up your site. See Website Backups: What to Back Up, How Often, and How Restores Work.
  2. If you can, try the new theme on a staging (test) copy first.
  3. Use Live Preview to see the new theme with your content before you activate it.

Install and activate a new theme

  1. Go to Appearance > Themes.
  2. Click Add Theme, search the directory, and click Install. For a theme you bought, click Upload Theme and choose the zip file.
  3. On the theme's card, click Live Preview to check it.
  4. Click Activate when you're happy. Your active theme's card shows Customize instead.
  5. Check your menus, home page, and widgets or template parts, and fix anything that moved.

Customize the theme you have

Block theme:

  1. Go to Appearance > Editor.
  2. Click Styles to change colors, fonts, and spacing across the whole site.
  3. Click Templates or Patterns to edit layouts, headers, and footers.
  4. Click Save.

Classic theme:

  1. Go to Appearance > Customize.
  2. Work through the panels (they vary by theme). Changes show in the preview on the right.
  3. Click Publish.

These changes are stored in your site's database, so normal theme updates won't wipe them out.

When you need a child theme

If you (or a developer) edit a theme's files directly, like its CSS, templates, or functions.php, those edits are lost the next time the theme updates. A child theme fixes that. It's a small theme that borrows everything from the main (parent) theme and holds only your changes. The parent theme can update safely while your changes stay put.

You probably need a child theme if:

  • You're adding custom code or editing theme template files
  • You're adding a lot of custom CSS

You probably don't need one if:

  • You only change settings in the Site Editor or Customizer
  • You only add a little CSS in Appearance > Customize > Additional CSS (classic themes) or the Additional CSS option in Styles (block themes)

How a child theme is set up

A child theme is a folder in wp-content/themes with at least a style.css file. The header at the top of that file names the parent theme in a Template: line. Classic child themes usually also have a functions.php file that loads the parent's styles. Some themes offer a ready-made child theme to download.

This is developer work, and a mistake can take your site down. Have someone comfortable with code set it up, and test it on a staging copy.

Keep your theme updated

Theme updates fix bugs and security issues just like plugin updates. Delete themes you don't use, but keep one default WordPress theme installed as a fallback. See How to Update WordPress Safely (Back Up First).

Related

Prefer we handle it?

If you'd rather spend your time running your business, our boutique hosting, available to our clients, including sites moved over from another host, takes a proactive approach to security and monitoring, with nightly backups, 24/7 outage monitoring, and ongoing core CMS updates.

How to Change Your Logo, Colors, and Fonts in WordPress

Using Joomla instead? See How to Change Your Logo, Colors, and Fonts in Joomla.

Changing your logo, colors, and fonts in WordPress depends on which kind of theme you have. These steps are for WordPress 6.x and later.

Quick check: Go to Appearance. If you see Editor, you have a block theme. If you see Customize and no Editor, you have a classic theme. Some themes and page builders have their own branding settings too, so check your theme's docs.

Back up before big changes. See Website Backups: What to Back Up, How Often, and How Restores Work.

Block themes

Change your logo

  1. Go to Appearance > Editor.
  2. Click Patterns, then open the Header template part (or open a template and click the header).
  3. Click the Site Logo block. If there isn't one, add it with the + button.
  4. Click Replace (or the upload area) and pick your logo from the Media Library or upload it.
  5. Drag the corner or use the block settings to set the width.
  6. Click Save.

Change colors

  1. Go to Appearance > Editor > Styles.
  2. Try a ready-made style variation, or click the edit (pencil) icon and go to Colors.
  3. Edit the Palette to add your brand colors.
  4. Set colors for text, background, links, buttons, and headings.
  5. Click Save.

Change fonts

  1. In Styles, open Typography.
  2. Pick fonts for text, headings, links, and buttons.
  3. To add a font, open the font library (look for a fonts or manage-fonts option in Typography). Its Library tab shows the fonts installed on your site, and the Upload tab lets you add your own font files. Some versions also let you install Google Fonts from there.
  4. Click Save.

Make sure you have the right license for any font you upload.

Classic themes

Change your logo

  1. Go to Appearance > Customize.
  2. Open Site Identity (some themes call it Header or Logo).
  3. Click Select logo and pick or upload your image.
  4. While you're there, set the Site Icon, the little image in browser tabs.
  5. Click Publish.

Change colors and fonts

Look in the Customizer for panels like Colors or Typography. What's available depends on the theme. Some offer a lot, some offer very little.

If your theme doesn't have the option you need, add a bit of custom CSS in Appearance > Customize > Additional CSS, or ask a developer to set up a child theme for bigger changes. See How to Change or Customize Your WordPress Theme (and When to Use a Child Theme).

Logo tips

  • Use a PNG or SVG with a transparent background. (WordPress doesn't allow SVG uploads by default. A plugin can add support, but SVGs can carry harmful code, so only use files you trust.)
  • Upload a logo close to the size it shows on screen, around two times wider for sharp display on high-resolution screens.
  • Upload a new file instead of replacing the old one, so browsers don't keep showing the cached version.

Check your changes

Related

Want a fresh look?

If your branding needs more than a few tweaks, our website design team can help. Or call us at 678-379-9321 or email This email address is being protected from spambots. You need JavaScript enabled to view it..

How to Edit a Page or Post in WordPress (Block Editor)

Using Joomla instead? See How to Edit an Article in Joomla 5 and 6.

This guide covers the WordPress 6.x block editor. If your site uses a page builder or the Classic Editor plugin, the screens will look different.

1. Log in

Go to yoursite.com/wp-admin and sign in.

2. Find the page or post

  1. Go to Pages > All Pages or Posts > All Posts.
  2. Use the search box, or filter by date or category.
  3. Hover over the title and click Edit.

3. Edit content with blocks

Everything in the editor is a block: paragraphs, headings, images, buttons, and so on.

  • Change text: click into a block and type.
  • Add a block: click the + button (top left, or between blocks) and pick one, or type / followed by the block name on a new line, like /heading.
  • Move a block: select it and use the up and down arrows or the drag handle in the toolbar.
  • Remove a block: select it, open the three-dot menu in the toolbar, and choose Delete.
  • Block settings: the sidebar on the right (open it with the settings icon at top right) shows options for the selected block.
  • Links: select text and click the link icon, then search for a page or paste a URL.
  • Headings: use Heading 2 for main sections and Heading 3 under those.
  • List View: the list icon at top left shows every block, which helps on long pages.

To paste from Word or Google Docs, paste into a paragraph block. WordPress converts most formatting into blocks. Check the result.

For images, see How to Add, Resize, and Caption Images in WordPress (with Alt Text).

4. Page or post settings

With no block selected, the sidebar's Page or Post tab shows status, publish date, URL, author, featured image, and (for posts) categories and tags. SEO titles and meta descriptions aren't part of core WordPress; set them in your SEO plugin's panel if you have one.

5. Save

  • Click Save at the top right. (Older versions of WordPress label this button Update.)
  • Use Preview to check the page first. View opens the live page.
  • For an unpublished draft, Save draft saves without publishing.

Undo a change with revisions

WordPress saves revisions as you work.

  1. In the Page or Post sidebar tab, click Revisions.
  2. Use the slider to compare versions.
  3. Click Restore This Revision.

For small slips, Undo (the curved arrow at top, or Ctrl+Z / Cmd+Z) works too.

Someone else is editing?

WordPress warns you if another user has the page open. You can go back, preview, or take over. Taking over locks them out, so check with them first.

Prefer we handle it?

If you'd rather spend your time running your business, our team can take care of edits, updates, and upkeep for you. See Website Care & Hosting.

How to Plan a Website Redesign: A Step-by-Step Guide

A redesign goes a lot smoother when you plan it before anyone opens a design file. Here's the order we suggest, whether you work with us or not.

1. Decide why you're redesigning

Write down what isn't working now and what you want the new site to do. Common reasons:

  • The site looks dated or doesn't match your brand anymore
  • Visitors can't find what they need
  • It's hard for your team to update
  • It doesn't work well on phones
  • You need new features, like online booking or a store

Turn those into two or three goals you can check later, such as "more quote requests through the site" or "staff can post news without calling anyone."

2. Look at what you have

Before you change anything, take stock:

  • Pages: list every page and note which ones get used. Your analytics can show this.
  • Content: what's still accurate, what needs a rewrite, and what can go.
  • Features: forms, logins, integrations, and anything else the site does.
  • Search: which pages people find you through, so you don't lose them in the move.

3. Know who the site is for

Think about the people who visit and what they came to do. A homeowner looking for a quote needs different things than a current customer looking for a support number. Plan the site around those tasks.

4. Plan the structure

Sketch the main menu and the pages under it. Keep it simple and use the words your customers use. This is also when you list the old URLs that will change, so each one can be redirected to its new page.

5. Get your content ready

Content is the most common reason projects stall. Decide who's writing or updating each page, and gather photos, logos, and documents early. If you need help with writing, plan for that up front.

6. Choose the platform and features

Pick the platform that fits how you work. If you're deciding between the two we use most, see Joomla vs WordPress: Which Is Right for Your Business?. List must-have features separately from nice-to-haves so you can phase things if you need to.

7. Design and build

Design usually starts with the homepage and a few key page types, then the rest of the site follows. Review on a phone as well as a computer, and check that the site works with a keyboard and screen readers.

8. Test and launch

Before go-live, check forms, links, redirects, analytics, and page speed, and make sure a backup is in place. After launch, watch for broken links and search changes for a few weeks.

9. Keep it up

A site needs updates, backups, and fresh content after launch. Decide who handles that before you go live.

How 3by400 can help

We plan, design, and build redesigns, mostly on Joomla, and we can take care of the site afterward. Learn more about our website design work, or see What Affects the Cost and Timeline of a Website Project.

Start a project

Ready to talk about your website? Start a project or reach us at 678-379-9321 or This email address is being protected from spambots. You need JavaScript enabled to view it.. We're based in Dalton, GA, and work with businesses everywhere.

How to Prepare Content for Your New Website

Content is the part of a website project that most often holds up the launch. Starting early makes everything else easier. Here's how to get it ready.

Start with a page list

Work from your site's planned structure (your sitemap). For each page, note:

  • What the page is for and who it's for
  • Who's writing or approving it
  • What photos or files it needs
  • Whether you're keeping, rewriting, or dropping old content

A simple spreadsheet works well for this.

Decide what to keep from your old site

  • Keep: pages that are accurate and still get visits.
  • Update: pages that are useful but out of date.
  • Combine: several thin pages that cover the same thing.
  • Drop: anything outdated or no longer relevant. Plan a redirect for any page that's dropped or moved.

Write for your visitors

  • Lead with what the visitor needs to know, then the details.
  • Use short paragraphs, clear headings, and lists.
  • Use the words your customers use, not internal jargon.
  • Give each page one clear next step, like calling, requesting a quote, or booking.
  • Write naturally. You don't need to repeat a keyword over and over to be found.

Gather photos and media

  • Use your own photos where you can: your team, your work, your location.
  • If you use stock photos, make sure you have the rights to use them.
  • Send the largest original files you have. They can be resized, but small images can't be made bigger without losing quality.
  • Use descriptive file names, and note what each photo shows so alt text is easy to write.

Collect the details

Have these ready:

  • Logo files (vector format if you have it)
  • Brand colors and fonts
  • Business name, address, phone, email, and hours
  • Social media links
  • Testimonials or reviews you have permission to use
  • Documents, menus, or PDFs to link to

Set a schedule

Give each page a due date and an owner. Ask for content in batches instead of all at once at the end. If writing isn't your thing, plan for help early. Content is one of the biggest factors in what affects the cost and timeline of a website project.

Related

How 3by400 can help

We can help you plan your content and organize your pages, and we offer copywriting if you'd rather have us write it for you. Learn about our website design work.

Start a project

Ready to talk about your website? Start a project or reach us at 678-379-9321 or This email address is being protected from spambots. You need JavaScript enabled to view it.. We're based in Dalton, GA, and work with businesses everywhere.