Although our business model is geared more toward providing services to specific clients, from time-to-time, we find opportunities to fill a development void. Our custom Joomla extensions are a good example of this practice. In a way, we use our extensions to help promote the products we find most useful in the Joomla world, such as MailChimp, HikaShop, and Braintree.
Our goal for these products is to help you get your message out and provide secure, easy payment for your customers.
If you are looking for a specific Joomla extension enhancement that you simply can't find, please
contact us!
 The 400 North Board of Realtors have a large professional organization and major communication needs--but their site did not match the professionalism of the organization and they were unable to make timely updates.
Not only was the site out-dated, but other organizations were passing them by in terms of tools available to help their members, and enabling member-to-member recognition and communication. As an educational association, the 400 North Board of Realtors needed a little schooling!
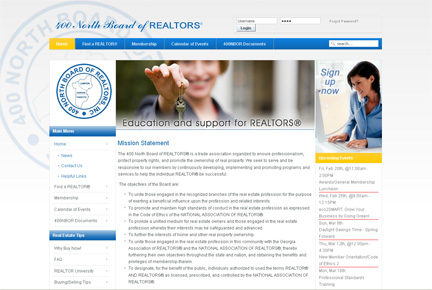 After a thorough proposal and evaluation process, the 400 North Board of Realtors chose 3by400 as their partner of choice. They could easily see the benefit of Joomla! and teaming with a group that had significant experience in developing solutions.
With the new 400 North Board of Realtors site, members can quickly see what new educational events are occuring and sign-up online. The internal administrator is able to easily make updates to the site--and does so frequently. In addition, the association now gathers dues with an online membership management tool that has made the process more effcient and improved the member experience.
See The 400 North Board of Realtors site -
www.400NorthBoardofRealtors.org
With Christmas around the corner, we thought was a good time to expose the Joomla! extensions that we keep on our list of "nice" ways to really make your web site sing. These tools range from just making repetitive tasks simpler to generating revenue. Read on to find our top picks.
The
Joomla Extension Directory (JED), is the very best source for current Joomla extensions. We go there regularly to help clients find tools and build solutions. With over 7,000 extensions on the date of this post, though, sifting through the possibilities can be tough. So, we're providing a description of some of the extensions we think truly escalate Joomla's core performance.
Joomla Content Editor (JCE)If you can use Microsoft Word, you can edit and create content on your Joomla! site. JCE has been our standard for many years, and they just keep getting better. Features like "paste as plain text" and "remove formatting" let you transfer content from Word or another web site with ease. The image editor allows "dressing" articles with photos easily loaded from your desktop and adding video from YouTube or Vimeo is a snap. JCE lets even the most novice site manager or contributor be extremely productive out of the gate.
XMapThis extension is one of those that you configure and forget, for the most part, but can be crucial to your site performing well as a Google search result. You can configure XMap to create a site map based upon your Joomla menus. You can eliminate menus from the display and set the order, too. An XML site map can be generated for submission to Google Webmaster tools---a good idea that will help Google quickly index your site.
Advanced Module Manager (AMM)This is how the core Joomla module manager really should work. AMM allows modules to be set to appear on pages by menu item--easy stuff that even the core module manager can do--but also EXCLUDE pages upon which you do not want the module to appear. You can assign a module by specific URL, set for display only to custom groups, make coffee in the morning...oh, wait, not that last part. But hopefully you get the picture. It really provides freedom in the assignment of all modules. Sweet!
RokSproketEveryone wants beautiful rotating images at the top of their page these days, and there are a lot of choices for doing so. RocketTheme took a little while to get there, but RokSproket is truly one of the easiest ways to get your high-impact graphics in place with minimum effort. Size and location are quick to configure, and RocketTheme offers numerous templates for the selection of navigation buttons and general presentaiton. If you are able to create graphics, this is the way to go.
Hopefully, these tips will help you choose the best options when selecting extensions of this nature. Be sure to check out our other "go to" Joomla applications in
Extensions We Like.
One of the things we try hard to do is not reinvent the wheel. That's why we use Joomla! instead of writing our own Content Management System, why we search hard for off-the-shelf components before we write our own. For our servers, we rent from a large, reputable company and use one of the three industry-standard control panels. This is to give our customers the best value for their money by not reinventing wheels and for security, in case we lose a team member as standard skills are much easier to replace. There's one exception to our 'never reinvent the wheel' rule...
and that's of course if the wheel is square. Such was an ongoing struggle we've had: backup. The control panel software we use had automatic scheduled backup facilities: daily or weekly backups, what time, how many to keep, etc. And for a server with very few sites it was probably adequate. One of our servers has about 80 sites and many have e-commerce on them so they have to be backed up nightly. The backup routines started taking longer and longer, with backups overlapping each other and slowing the system down. I wrote a procedure to try to spread them out, but still they piled up and hurt performance. So I finally took a weekend and ripped out the standard backup procedure and replaced it with a more robust one. This new one can do both full backups (everything on the site) and incremental (just what's changed from the previous backup). This is a major win because if you'll think about it, most of the contents of your site don't change from one day to the next. Now instead of keeping three days' worth of full backups with the old software, we can now keep seven days' of backup with the new software because we're only doing one full backup, then a series of daily incrementals.
All in all, you probably don't care about the gory details of backup, but that's just one of the behind-the-scenes things we worry about and try very hard to get right. The bottom line is that instead of slogging down the server for six hours a night, backup now runs smoothly in two hours. As a result, a couple of our sites had perfect 100% uptime for a month. And that's something everyone understands and appreciates.
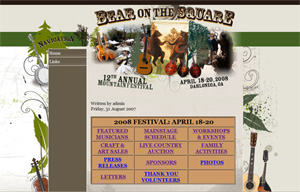 The Bear on the Square Executive Committee liked their old site. Only problem was that they had a difficult time getting the site updated and making it really look the way the festival feels to performers and attendees. Although the site was appealing, it was difficult for the Communications Committee to keep updated on a regular basis and maintain the styling so the site could remain professional. In addition to the update issues, the site just wasn't as hip as the event.
As the new official web sponsor for Bear on the Square Mountain Festival, 3by400 spent significant time determining what would ultimately be t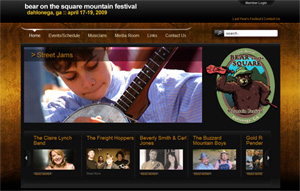 he cool, new skin of the new site. In addition, the entire Communications Committee was trained on updating the tool using global CSS so individual content styling was eliminated.
Additionally, 3by400 has provided tools that truly showcase musicians through images and a media players so future audiences can get the true feel of the event. A colorful flash gallery on the home page helps relate the experience. The latest update, a calendar, simplifies the process of publishing the ever-growing calendar of events.
See The Bear on the Square site - www.BearOnTheSquare.org

We've now been working with Joomla! for over ten years--since its inception in August 2005. In that 10 years, we have worked with hundreds of web sites and learned a thing or two. One of the tremendous advantages of Joomla! is the vast array of third-party extensions - components, modules and plugins - available to add almost any functionality you can think of to your web site. On occasion, a client requires functionality that cannot be provided by an existing Joomla! extension, so what do you do when Joomla! or one of those extensions doesn't do everything you need?
There are many developers out in the world and even those who know SQL and PHP, the foundation upon which Joomla! is built. However, if you hire a developer to add functionality to your Joomla! site, their ability to work within the context of Joomla! is critical. We have cleaned up many a site in which a well-meaning developer thought that changing core Joomla! code or the core code of a major extension was the right approach. The problem becomes evident the next time you need critical updates to Joomla! or the modified extension. In a worst case, you may not be able to perform the updates, and if you can, you will have lost the customizations.
Although less disasterous, we have seen some instances where the simple beauty of standard functions like menus and modules were hard-coded, rendering maintenance and updates impossible for the average administrator.
Why do they do it? Because they simply don't know the Joomla! Way.
What is the Joomla! Way
The Joomla! Way is focused on making updates and additions to the site as simple as they can possibly be, using standard tools like the Menu and Module Managers in their native mode. Keep it core Joomla! as much as you possibly can and only extend when necessary...and it will almost always be necessary for sites with any degree of complexity.
Another key element of the Joomla! Way is that where new functionality is required, search diligently through the
Joomla! Extension Directory(JED) and keep an open mind. Just because an extension was originally designed for one purpose doesn't mean that is its only application. Think outside the box and consider that by re-labeling fields and changing naming conventions, using the Joomla! Language Manager, an existing extension may fit perfectly for your need. Also, be sure to vet the developer before you select their extension. The JED is a great source because the Joomla! Foundation performs significant review before extensions are allowed in the directory, but it is still a good idea to look at recent reviews and product demos.
The most crucial aspect of the Joomla! Way is that if you cannot find an existing extension to meet your needs, or need modifications to an extension, find a developer who has Joomla! development expertise and can demonstrate that proficiency through development examples.
The proper way to customize most extensions is through plugins and/or modules, and those should be enveloped in an installer package. If you can't load it through the standard Joomla! extension installation, it has not been created in the Joomla! Way. If a developer says they must make changes at the SQL level or modify core Joomla! files manually, they are not observing the Joomla! Way. If you are told not to update Joomla! after a customization has been made, it was not the Joomla! Way.
Even Styling has a Joomla! Way
Since most site administrators are not necessarily well-versed in HTML (nor should they have to be for Joomla!), inline styling and customization should also be held to a minimum. If styling changes are required, they should be applied globally through a custom CSS or an SCSS override that extends template CSS/SCSS and is not over-written when the template is updated. If you are using a template provider who does not allow for customizing the CSS/SCSS using a custom override, they are probably not doing things the Joomla! Way.
Who Does Things the Joomla! Way?
We do! And there are many other professionals around the world doing things the Joomla! Way! You can find some of them in the
Joomla Resource Directory (JRD), and although there is some work involved in being listed in the JRD, there is no test or performance requirement to prove that a resource is working the Joomla! Way.
Diligence at the beginning of your search will help ensure the value of your investment over time and the long-term ease of use that you should be able to demand of your Joomla! site.
If you want help with a custom project or anything Joomla!, please
contact us. We promise to always do it the Joomla! Way!
When we work with someone who wants to blog, and they don't want to use Joomla content items (like we're using here), we generally recommend
blogger.com. This is a free service from Google. It's a bit limited, but it's drop-dead simple. We can then do an RSS feed from the blog to the main website. There's another blogging service that's about to get my nod. It's called
Tumblr. I think it may be even simpler than blogger.
A prospective customer wrote us that he was offered a 'screeming deal' on GoDaddy for $7 per month. Would we still be able to support his site there? Here's what I wrote back...
If you choose to host your site at GoDaddy, we'll be of very limited help to you. They really don't do a good job of Joomla hosting, see: http://www.joomlahostingreviews.com/ where GoDaddy ranks near the bottom of the heap.
Also they're notorious for security breaches. See such tales of woe as: http://smackdown.blogsblogsblogs.com/2010/05/13/hosting-with-godaddy-might-want-to-rethink-that-decision/. You can google for literally thousands of others.
In short, they don't have the tools or apparently the inclination to really do a good job of hosting dynamic websites like Joomla or
Wordpress.
Also consider: would you really be saving money? As an example, this week a security patch for Joomla came out: 1.5.21. I installed it on all our sites automatically with no charge to our customers. If you were to be hosted at GoDaddy, I'd have to do a special one-of update for your site that would take me about a half hour. With my billing rate, you've just lost a number of months of savings that 'screaming deal' bought you.
It's your choice, but if you do go with GoDaddy, we'll not be able to offer the level of support we like to provide and that we think you and your site deserve.
That's where I ended the letter, so I didn't even get into such things as site performance enhancements we provide by tweeking the Apache webserver configurations, regular database integrity monitoring, backing Joomla sites up the right way (both files and database at the same time), intelligent database, joomla and php caching, etc. The long and short of it is: not all hosting providers are created equal and not many really understand how to host Joomla.
If several people write for your site, Joomla's workflows let you set up steps, like draft, review, and publish, so nothing goes live before it's checked. Workflows are built into Joomla 5 and 6 but are turned off by default.
Before you start: workflows change how publishing works for everyone on the site. Try it on a staging copy first, and take a backup.
How workflows work
- A workflow is your publishing process.
- Stages are the steps an article can be in, like Draft, In Review, or Published.
- Transitions move an article from one stage to another, like "Send for review" or "Publish." A transition can also change the article's status (published or unpublished), send email notifications, and be limited to certain user groups.
Joomla comes with a Basic Workflow you can use as-is or copy and change.
Turn on workflows
- Go to Content > Articles.
- Click Options in the toolbar.
- Open the Integration tab.
- Set Enable Workflow to Yes.
- Click Save & Close.
Set up your workflow
- Go to Content > Workflows.
- Open the Basic Workflow, or click New to make your own.
- Click the number in the Stages column to add or rename stages.
- Click the number in the Transitions column to add transitions. For each one, set:
- Current Stage (where it starts) and Target Stage (where it ends up)
- The article's status after the transition, on the Transition Actions tab (Publishing State)
- Who gets an email, on the Notification tab (Send Notification, plus the users or user groups)
- Who can use it, on the Permissions tab
- Set your workflow as the Default if you want all new articles to use it.
In Joomla 6.1 and later, a Graph button on a workflow opens a visual editor where you can drag stages and connect transitions.
You can also assign a workflow to a category, so different sections of your site follow different processes. Open the category (Content > Categories), go to its Workflow tab, and choose a workflow in the Workflows field, or leave it on the default.
Using workflows day to day
- Writers create articles as usual. New articles start in the workflow's first stage.
- In Content > Articles, the Stage column shows where each article is.
- To move an article, click its stage in the article list and choose a transition, or tick articles and use Run Transition in the Actions menu. When editing an article, pick one in the Transition field.
Example: draft, review, publish
- Draft: the writer works on the article (unpublished).
- Send for review: moves it to In Review and emails the editors.
- Publish: an editor approves it, and the article goes live.
- Send back: an editor returns it to Draft with notes.
Turning workflows off
Set Enable Workflow back to No in the article options. Articles keep their current published or unpublished status.
Related
Prefer we handle it?
If you'd rather spend your time running your business, our boutique hosting, available to our clients, including sites moved over from another host, takes a proactive approach to security and monitoring, with nightly backups, 24/7 outage monitoring, and ongoing core CMS updates.
Using WordPress instead? See How to Add a Blog Post in WordPress.
In Joomla, blog posts and news items are articles. Which category you put them in decides where they show up. Here's how to add one in Joomla 5 or 6.
1. Start a new article
- Log in to your admin at
yoursite.com/administrator.
- Go to Content > Articles.
- Click New in the toolbar.
2. Add a title and content
- Title: the headline readers will see.
- Alias: leave it blank and Joomla creates one from the title. This becomes part of the post's URL.
- Content tab: write or paste your post in the editor. For editing basics, see How to Edit an Article in Joomla 5 and 6.
3. Add a Read More break (optional)
Blog pages often show just the start of each post with a "Read more" link. To control where it breaks, click in the text where you want the break and choose CMS Content > Read More in the TinyMCE toolbar. A red dashed line marks the break.
4. Choose the category
In the right-hand panel, set the Category to your blog or news category. If you're not sure which one shows on your blog page, check with whoever set up your site. The menu item for your blog page is linked to a category.
You can also add Tags in the same panel if your site uses them.
5. Add images
On the Images and Links tab:
- Intro Image: shown on blog listing pages.
- Full Article Image: shown on the post itself.
Fill in Image Description (Alt Text) for each. See How to Add, Resize, and Caption Images in Joomla (with Alt Text).
6. Featured or not
Set Featured to Yes if you want the post to show on pages that list featured articles, often the home page. Ask your web team how your site uses it.
7. Schedule it (optional)
On the Publishing tab:
- Start Publishing: set a future date and time, and the post goes live then.
- Finish Publishing: optional. The post is unpublished automatically at that time.
You can also set the Meta Description for the post here. See How to Change a Page's SEO Title and Meta Description in Joomla.
8. Publish and save
- Set Status to Published (or leave it Unpublished to save a draft).
- Click Save & Close.
- Check your blog page to see it.
Prefer we handle it?
If you'd rather spend your time running your business, our boutique hosting, available to our clients, including sites moved over from another host, takes a proactive approach to security and monitoring, with nightly backups, 24/7 outage monitoring, and ongoing core CMS updates.
Using WordPress instead? See How to Add a Redirect in WordPress.
When a page moves or is removed, a redirect sends visitors and search engines from the old address to a new one. Joomla 5 and 6 include a Redirects component for this.
Before you start: turn it on
The Redirects component needs its plugin enabled:
- Go to System > Manage > Plugins.
- Search for System - Redirect and enable it.
- Open the plugin and set Collect URLs to Yes if you want Joomla to log 404 (page not found) errors for you. It's on by default. Turn it off again if the list fills up with junk.
Joomla's help says Use URL Rewriting must be on in System > Global Configuration (Site tab, SEO settings), and on Apache servers the htaccess.txt file must be renamed to .htaccess, for redirects to work. Ask your web team if you're not sure.
Add a redirect
- Go to System > Manage > Redirects.
- Click New.
- Expired URL: the old address. Joomla's help says to enter the full URL as you'd type it in a browser.
- New URL: where it should go now.
- Set Status to Enabled.
- Leave the redirect as a 301 (permanent), which is the default. To pick a different code, first set Activate Advanced Mode to Yes under Options; a Redirect Status Code field then appears.
- Click Save & Close.
Test it by visiting the old URL in a private browser window.
Important: the old URL must not still load a working page. Joomla only redirects addresses that would otherwise be 404 errors.
Fix 404 errors Joomla has collected
If Collect URLs is on, broken addresses visitors hit show up in the Redirects list with no New URL. Open one, add the New URL, enable it, and save. The 404 Hits column shows which ones get the most traffic, so fix those first.
Several at once
Use Bulk Import in the toolbar to add many redirects at once. Or select several and use Batch update new URL(s) at the bottom of the list to point them all at one page.
Tips
- Redirect to the closest matching page, not just the home page.
- Avoid chains (A to B to C). Point the old URL straight to the final page.
- Changing an article or menu item alias changes its URL, so add a redirect when you do.
- Clean out disabled redirects with Purge Disabled.
Related
Prefer we handle it?
If you'd rather spend your time running your business, our boutique hosting, available to our clients, including sites moved over from another host, takes a proactive approach to security and monitoring, with nightly backups, 24/7 outage monitoring, and ongoing core CMS updates.
Using WordPress instead? See How to Add Users and Set Roles in WordPress.
Giving each person their own login, with only the access they need, keeps your site safer and makes it easier to see who changed what.
How Joomla permissions work
- User groups control what someone can do, like create, edit, or publish articles, or log in to the admin.
- Access levels control what someone can see on the front of the site, like Public or Registered-only pages.
Joomla's default groups are Public, Guest, Registered, Author, Editor, Publisher, Manager, Administrator, and Super Users; your site may have custom ones. The ones you'll assign most often:
- Author: can write articles from the front of the site.
- Editor: can also edit others' articles.
- Publisher: can also publish.
- Manager: can use the admin for content.
- Administrator: broad admin access.
- Super Users: full control. Keep this to as few people as possible.
Permissions for each group are set under System > Global Configuration > Permissions, and many sites adjust them, so check with your web team before changing them.
Add a user
- Log in at
yoursite.com/administrator.
- Go to Users > Manage and click New.
- On Account Details, enter Name, Login Name, Email, and a Password (and Confirm Password). You can set Require Password Reset to Yes so they choose their own at first login.
- On Assigned User Groups, tick the group(s) that match the access they need.
- Click Save & Close.
Send them their login details through a secure channel, not in the same email as the password.
Change someone's access
Open the user in Users > Manage, change their Assigned User Groups, and save.
Remove former staff
Do this as soon as someone leaves.
- Block them: open the user and set User Status to Blocked. Their account and history stay, but they can't log in.
- Delete them: tick the user in Users > Manage and click Delete. Articles they created stay on the site.
Blocking is often the safer first step. Also change any shared passwords they knew, like hosting or FTP.
Turn on multi-factor authentication
Joomla includes multi-factor authentication. Each user sets it up in their own profile, on the Multi-factor Authentication tab. Encourage everyone with admin access to turn it on.
Review users regularly
A few times a year, go through Users > Manage and remove or block accounts that aren't needed.
Related
Prefer we handle it?
If you'd rather spend your time running your business, our boutique hosting, available to our clients, including sites moved over from another host, takes a proactive approach to security and monitoring, with nightly backups, 24/7 outage monitoring, and ongoing core CMS updates.
Using WordPress instead? See How to Add, Resize, and Caption Images in WordPress (with Alt Text).
This covers the built-in tools in Joomla 5 and 6: the Media Manager and the article editor (TinyMCE).
Before you upload: size and format
Large images slow your site down. Before uploading:
- Width: resize to about the largest size it will display. As a rule of thumb, we recommend about 1920px wide for full-width banners, about 1200px for images that span the main content area, and about 800px or less for images that sit beside text. Your template may differ, so ask us if you're not sure.
- Format: use JPEG or WebP for photos, PNG for graphics with sharp edges or transparency, and SVG only if your site is set up to allow it.
- Compress: run photos through a compression tool or your photo editor's "export for web" option before uploading. A JPEG quality setting around 70-80% usually looks the same to visitors and is much smaller. Smaller files mean faster pages, especially on phones.
- File name: use plain, descriptive names like
front-office-dalton.jpg, not IMG_4032.jpg.
Upload to the Media Manager
- Go to Content > Media.
- Open the folder you want (or create one with Create New Folder).
- Click Upload and pick your file, or drag files into the window.
Resize or crop in Joomla
Joomla has a basic image editor:
- In Content > Media, hover over the image and click the pencil (edit) icon.
- Use the Crop, Resize, and Rotate tabs. (The image editor works with JPEG, PNG, and WebP files.)
- Click Save & Close. This changes the file itself, so keep an original copy elsewhere if you may need it.
Add an image to an article
- Open the article (Content > Articles, then click the title).
- Click in the text where you want the image.
- Click CMS Content > Media in the editor toolbar.
- Select the image (or upload one from here).
- Fill in the fields:
- Image Description (Alt Text): see below.
- No Description: tick only for purely decorative images.
- Image Class: optional, for alignment classes your template provides.
- Lazy Loading: leave on so images below the fold load as needed.
- Figure Caption: text shown under the image.
- Click Insert Media, then Save.
To change the displayed size later, click the image in the editor, click the image button in the toolbar, and adjust the width and height (keep the proportions locked). Displaying a big file smaller doesn't make it load faster, so resize the file itself when you can.
Intro and full article images
The Images and Links tab has Intro Image and Full Article Image fields, each with its own description (alt text), No Description option, and caption. Your template decides where these show, usually in blog lists and at the top of the article.
Writing good alt text
Alt text is read aloud by screen readers and shown if an image doesn't load. It helps people and search engines understand the image.
- Describe what matters in the image in a short sentence: "Two technicians installing a heat pump outside a brick house."
- Don't start with "image of" or "picture of."
- If the image is a link or button, describe where it goes.
- If the text around it already says the same thing, or it's decoration, tick No Description so screen readers skip it.
- Don't stuff it with keywords.
Prefer we handle it?
If you'd rather spend your time running your business, our team can take care of edits, updates, and upkeep for you. See Website Care & Hosting.
Using WordPress instead? See How to Change a Page's SEO Title and Meta Description in WordPress.
The page title and meta description are what people often see in search results. Joomla has fields for both built in. Where you set them depends on how the page is reached.
Note: search engines don't always use your title and description exactly as written, but setting good ones gives you the best chance.
Write a good title and description
- Title: describe the page clearly, put the most important words first, and keep it to about 60 characters so it isn't cut off.
- Meta description: a sentence or two (about 155 characters or fewer) that tells people what they'll find and why to click.
- Make each page's title and description unique.
- Write for people. Repeating keywords won't help.
Meta description: on the article
- Go to Content > Articles and open the article.
- On the Publishing tab, under Metadata, fill in Meta Description.
- Leave Keywords blank. Search engines don't use it.
- Click Save & Close.
Page title: on the menu item
If the page has its own menu item (most main pages do), the title comes from the menu item.
- Go to Menus and open the menu item for the page.
- On the Page Display tab, fill in Browser Page Title. If it's blank, Joomla uses the menu item's title.
- Save.
Menu items also have a Metadata tab with their own Meta Description. For a single article page, the article's meta description wins when both are filled in; the menu item's is used only if the article's is blank. To keep things simple, fill in one place.
Page title for articles without a menu item
For articles reached from a blog or category list (like blog posts), use the article's Options tab and fill in Browser Page Title. Joomla uses it when the article is viewed through a non-article menu item.
Site name in titles
Under System > Global Configuration, the Site tab's Include Site Name in Page Titles setting adds your business name before or after every title. Changing it affects the whole site, so ask before you change it.
Home page
Your home page's title and description are on its menu item (the one marked as Default Page), or under System > Global Configuration > Site Meta Description.
Related
Prefer we handle it?
If you'd rather spend your time running your business, our boutique hosting, available to our clients, including sites moved over from another host, takes a proactive approach to security and monitoring, with nightly backups, 24/7 outage monitoring, and ongoing core CMS updates.
Using WordPress instead? See How to Change Menus and Navigation in WordPress.
In Joomla, each link in your navigation is a menu item. Menu items also control what shows on each page, so a little care goes a long way.
Before you start: changing a menu item's alias changes the page's URL. If the page has been live a while, add a redirect from the old URL.
Find your menu
- Log in at
yoursite.com/administrator.
- Go to Menus and pick the menu you want (for example, Main Menu). Menus > All Menu Items shows every item.
Add a menu item
- In the menu, click New.
- Enter a Title. This is the text shown in the menu.
- Next to Menu Item Type, click Select and choose what the link shows. Common types:
- Articles > Single Article: one article.
- Articles > Category Blog or Category List: a list of articles from a category.
- Contacts, Smart Search, and others: pages from those features.
- System Links > URL: a link to any address, including another website.
- Pick the specific article, category, or URL.
- In the right panel, check Menu and set the Parent Item. Leave it as Menu Item Root for a top-level item, or pick another item to make this a submenu item.
- Click Save & Close.
Rename a menu item
Open the item, change the Title, and save. The page's URL only changes if you change the Alias.
Reorder menu items
In the menu's item list, drag items by the handle on the left. You can also set Ordering inside an item.
Move an item under another
Open the item and change Parent Item.
Hide or remove a menu item
- Hide it but keep the page: on the Link Type tab, set Display in Menu to No. Any submenu items under it are hidden too.
- Turn it off: set Status to Unpublished. The page won't be reachable through that menu item.
- Delete it: trash it, then empty the trash. Don't remove your Home item (the one marked as Default Page).
Page titles and headings
On the Page Display tab:
- Browser Page Title: the title in the browser tab and search results.
- Show Page Heading and Page Heading: whether a heading shows at the top of the page, and its text.
Where the menu shows
Menus are displayed on your site by a Menu module. If a new menu isn't showing, it may need a module. See Joomla Modules Basics: Positions, Assignments, and Visibility.
Related
Prefer we handle it?
If you'd rather spend your time running your business, our boutique hosting, available to our clients, including sites moved over from another host, takes a proactive approach to security and monitoring, with nightly backups, 24/7 outage monitoring, and ongoing core CMS updates.
Using WordPress instead? See How to Change Your Logo, Colors, and Fonts in WordPress.
Most branding changes in Joomla happen in your template style, the saved settings for your template. Here's where to look. These steps are for Joomla 5 and 6, using the default Cassiopeia template as the example. If your site uses a different template, the idea is the same but the options will look different.
Make a copy first
- Log in at
yoursite.com/administrator.
- Go to System, then in the Templates panel click Site Template Styles.
- Tick your current style (the one with the gold star is the default) and click Duplicate.
Now you can try changes on the copy and switch back if you don't like them. Back up your site too. See Website Backups: What to Back Up, How Often, and How Restores Work.
Change your logo
- Open your template style.
- Go to the Advanced tab.
- Make sure Brand is set to Yes.
- Under Logo, click Select and choose an image from the Media Manager, or upload a new one.
- If you'd rather show text, leave the logo empty and fill in Title (and Tagline if you want one).
- Click Save and check the front of your site.
Logo tips: Use a PNG or SVG with a transparent background, and size it close to how big it shows on screen. Upload a fresh copy instead of overwriting the old file, so browsers don't keep showing the old one from cache.
Change colors
On the Advanced tab, use Colour Theme to pick one of Cassiopeia's built-in color themes. Save and check your site.
For your exact brand colors, you'll need a bit of custom CSS (see below).
Change fonts
On the Advanced tab, use Fonts Scheme to choose between system fonts and a few web font options. Depending on your choice, you can also set the Body Font Stack and Heading Font Stack. Save and check your site.
If your brand uses a different font, add it with custom CSS. Make sure you have the right license for any font you use.
Add custom CSS the safe way
Don't edit the template's main CSS files. Updates will overwrite them. Cassiopeia loads a user.css file for your own styles if one exists. It isn't there by default, so you'll create it:
- Go to System, then in the Templates panel click Site Templates.
- Click Cassiopeia Details and Files.
- Use the new file button in the editor toolbar to create a CSS file named
user in the css folder. It ends up at media/templates/site/cassiopeia/css/user.css. Skip this step if the file already exists.
- Add your CSS, for example your brand color for links or buttons.
- Click Save and check your site. You may need to refresh or clear your browser cache.
If you're comfortable with Cassiopeia's CSS variables, you can set your brand colors there in one place. This is developer territory, so test on a copy first.
For changing the HTML of a page section (not just its look), see Joomla Template Overrides: Change How Pages Look Safely.
Using YOOtheme Pro?
Many Joomla sites use YOOtheme Pro, which has its own visual customizer instead of the Cassiopeia settings above. The steps below match recent versions. Older versions may label things a little differently.
Open the customizer
- Go to System, then in the Templates panel click Site Template Styles.
- Open your YOOtheme style. (You can also use the YOOtheme link in the System menu.)
- The customizer opens with a live preview of your site. Its menu has Layout, Style, Pages, Templates, Menus, Modules, and Settings.
Change your logo
- Go to Layout > Site.
- Choose your image under Logo Image. For an SVG logo, you can turn on the inline SVG option and set the width and height.
- If you'd rather show text, use Logo Text.
- Fill in the optional logo fields if your design needs them: Inverse Logo (for dark backgrounds), Mobile Logo, Mobile Inverse Logo, and Dialog Logo (used in the mobile menu dialog).
- Click Save.
Change colors and the overall style
- Go to Style. Pick a style to start from, if you haven't already.
- Open Global.
- Set your text and link colors: Color, Emphasis Color, Inverse Color, Link Color, Link Hover Color, and Muted Color.
- In the Backgrounds group, set Background, Primary Background, and the others. These flow through to sections, buttons, and other elements across the site.
- Click Save.
Change fonts
- Go to Style > Global.
- Set the main Font Family. Use the Primary, Secondary, and Tertiary groups for the fonts used in headings and other elements.
- If you use Google Fonts, Style > Google Fonts lets you pick which weights to load. Fewer weights means faster pages.
- Click Save.
Custom CSS in YOOtheme Pro
Add custom CSS in Settings > CSS. Use that instead of editing template files, so updates don't wipe out your changes.
Using a different template?
Other third-party templates and page builders have their own customizers too. Look in the template style settings or its own admin screen for logo, color, and font options. The same rules apply: copy the style first, and keep custom CSS in the place the template provides so updates don't wipe it out.
Check your changes
Related
Want a fresh look?
If your branding needs more than a few tweaks, our website design team can help. Or call us at 678-379-9321 or email This email address is being protected from spambots. You need JavaScript enabled to view it..
Using WordPress instead? See How to Edit a Page or Post in WordPress (Block Editor).
Most of the text on a Joomla site lives in articles. Here's how to change one in Joomla 5 or 6.
Note: Some sites use a page builder for certain pages. If an article opens and you don't see the text you expected, the page may be built another way. Ask whoever built your site.
1. Log in to the admin
Go to yoursite.com/administrator and sign in.
2. Find the article
- Go to Content > Articles.
- Use the Search box at the top of the list, or Filter Options to narrow by category, status, or author.
- Click the article's title to open it.
3. Edit the content
The Content tab has the article editor (TinyMCE by default). It works like a word processor:
- Type or paste text. To paste from Word or Google Docs without stray formatting, paste as plain text (Ctrl+Shift+V, or Cmd+Shift+V on a Mac) and format it in the editor.
- Use the Paragraph menu for headings. Use Heading 2 for main sections and Heading 3 under those, rather than bold text.
- To add a link, select text and click the link button. For a link to another page on your site, use CMS Content > Article or Menu.
- For images, see How to Add, Resize, and Caption Images in Joomla (with Alt Text).
Other tabs you might use:
- Images and Links: intro and full article images.
- Publishing: start and finish publishing dates, author, and the meta description (in the Metadata area).
On the right, you can change the Status (Published, Unpublished, Archived, Trashed), Category, and Featured setting.
4. Save
- Save keeps you in the editor.
- Save & Close saves and returns to the list.
- Close leaves without saving.
Then view the page on your site to check it. You may need to refresh, or clear the site cache under System > Maintenance > Clear Cache if your site uses caching.
Undo a change with versions
If versioning is turned on, the Versions button in the toolbar shows earlier saves. Select one and use Restore to bring it back.
Locked article? (checked out)
When someone opens an article, Joomla locks it so two people don't overwrite each other. A padlock icon in the list means it's checked out. This happens when someone closes the browser instead of clicking Close.
- If it's checked out to you, click the padlock to check it in.
- Admins can check items in under System > Maintenance > Global Check-in.
Always use Save & Close or Close to avoid this.
Prefer we handle it?
If you'd rather spend your time running your business, our team can take care of edits, updates, and upkeep for you. See Website Care & Hosting.
Extensions add features to Joomla: forms, galleries, backups, SEO tools, and more. Joomla has a few types (components, modules, plugins, templates, and languages), but you install and manage them all from the same screens. These steps are for Joomla 5 and 6.
Before you install anything
- Check whether you really need it. Joomla does a lot out of the box, like custom fields, tags, workflows, and smart search.
- Check the listing in the Joomla Extensions Directory (JED) or the developer's site: Joomla 5/6 compatibility, last update date, reviews, and support.
- Only download from trusted places. Never use "free" copies of paid extensions. They often contain malware.
- Back up first. See Website Backups: What to Back Up, How Often, and How Restores Work.
Install an extension
- Log in at
yoursite.com/administrator.
- Go to System, then in the Install panel click Extensions.
- Pick a tab:
- Upload Package File: drag in the zip file you downloaded.
- Install from URL: paste a download link from the developer.
- Install from Folder: for files already on the server (mostly for developers).
- Install from Web, if it's turned on, lets you browse the JED from inside Joomla.
- Joomla shows a message when the install works.
- Set up the extension. Components appear under Components in the menu. Modules and plugins may need to be published (enabled) before they do anything.
If it's a paid extension, enter your download key so it can get updates. Many extensions ask for it in their options, and you can also add it under System > Update > Update Sites.
Update extensions
- Back up your site.
- Go to System, then in the Update panel click Extensions.
- Click Check for Updates.
- Tick a few updates and click Update.
- Test your site, then do the next few.
Rather not deal with extension updates yourself? We can handle them on demand at reasonable hourly rates, so you only pay for what you need.
For the full process, including core updates, see How to Update Joomla Safely (Back Up First).
Enable or disable an extension
- Go to System, then in the Manage panel click Extensions.
- Search for the extension or filter by type.
- Click the status icon to enable or disable it.
Disabling is a good first step when you think an extension is causing a problem. Some core extensions are protected and can't be disabled or uninstalled.
Uninstall an extension
- Go to System > Manage > Extensions.
- Tick the extension.
- Click Uninstall and confirm.
Some extensions come as a package with several parts. Uninstall the package (type "Package") to remove everything at once. Uninstalling may delete the extension's data, so back up first.
If something breaks
- Disable the extension you just installed or updated.
- If you can't get into the administrator, restore your backup or ask your web team for help.
- Open a ticket if you're a client. See How to Get Support From 3by400.
Check for problems now and then
- System > Manage > Extensions with the Discover and Database screens can spot leftover files or database issues after updates.
- System > Update > Update Sites shows where updates come from. If an update site is disabled, that extension won't get updates.
- Remove extensions you no longer use.
Related
Prefer we handle it?
If you'd rather spend your time running your business, our boutique hosting, available to our clients, including sites moved over from another host, takes a proactive approach to security and monitoring, with nightly backups, 24/7 outage monitoring, and ongoing core CMS updates.
Using WordPress instead? See How to Restore a WordPress Site From a Backup.
Joomla doesn't include a backup and restore tool of its own. Restores are done with a backup extension (for example, Akeeba Backup) or through your host. Here's how the process works.
If your site was hacked, don't restore yet. Read My Website Was Hacked: What to Do Right Now first, or the problem can come right back.
Before you restore
- Pick the right backup. Choose one from before the problem started. Check the date.
- Back up the current site too, even if it's broken. You may need something from it.
- Note recent changes. Anything added after the backup date, like new articles, orders, or form entries, will be lost and may need to be re-entered.
- Restore to a staging copy first if you can, so you can check it before replacing the live site.
Option 1: your backup extension
The steps depend on the extension, but they're usually:
- If the site's admin still works, open your backup extension under Components and find the list of backups.
- Choose the backup and use the extension's restore option. The button name varies by extension.
- If the admin doesn't work, you'll usually upload the backup file and the extension's restore script to the server and run it in a browser. This takes server (FTP or file manager) access.
- Follow the steps to restore files and the database, then remove the restore script when you're done.
Option 2: your host
Many hosts keep their own backups and can restore them from the control panel or on request. Check whether it restores files, the database, or both. You need both for Joomla.
After restoring
- Log in to the admin and check that it works.
- Clear the cache under System > Clear Cache.
- Visit key pages, test forms, and check logins.
- Check System > Update for updates the backup may be missing, and apply them. See How to Update Joomla Safely (Back Up First).
- Re-enter any content added since the backup.
When to call us
- The admin won't load and you don't have server access
- You're not sure which backup to use
- The site was hacked
- Something still isn't right after restoring
If you're on our boutique hosting, which is available to our clients, including sites moved over from another host, your site has nightly backups kept for one week. Contact us about restoring from one. We can do restores on demand at hourly rates. See Website Backups: What to Back Up, How Often, and How Restores Work.
Prefer we handle it?
If you'd rather spend your time running your business, our boutique hosting takes a proactive approach to security and monitoring, with nightly backups, 24/7 outage monitoring, and ongoing core CMS updates.
Smart Search is Joomla's built-in site search. It builds an index of your content so visitors can search quickly, with suggestions and filters.
1. Check the plugins
Smart Search uses plugins to decide what gets indexed.
- Go to System > Manage > Plugins.
- In - Select Type -, choose finder to see the Smart Search plugins (Smart Search - Content, Smart Search - Categories, Smart Search - Contacts, Smart Search - Tags, and so on).
- Enable the ones for content you want searchable, and disable the rest.
- Clear the type filter, search for Content - Smart Search, and make sure it is enabled. This content plugin keeps the index updated when you save content.
2. Build the index
- Go to Components > Smart Search.
- Click Index in the toolbar.
- Wait for it to finish.
Smart Search shows no results until the index is built. After that, content is usually indexed as you save it. Run Index again after big imports or changes. Very large sites can index from the command line instead (ask your web team).
3. Add search to your site
4. Narrow results with search filters (optional)
Filters limit a search to certain content, like one section of your site.
- Go to Components > Smart Search > Filters.
- Click New and give the filter a name.
- Pick the content types, categories, authors, or languages to include.
- Click Save & Close.
- Select the filter in your Smart Search menu item or module settings.
Visitors can't change these filters. They're set by you.
5. Check what people search for
In Components > Smart Search > Options, set Gather Search Statistics to Yes. Then Components > Smart Search > Search Terms shows what visitors searched for. (The Statistics button on the Indexed Content screen shows index totals, not searches.) Searches with no results can point to content you should add.
Keep search results out of search engines
Search results pages shouldn't be indexed by Google. On the search menu item's Metadata tab, set Robots to noindex, follow.
Search not finding something?
- Check the content is published and public.
- Check its Smart Search plugin is enabled.
- Run Index again.
- Use Clear Index in the toolbar and re-index if results look wrong.
Related
Prefer we handle it?
If you'd rather spend your time running your business, our boutique hosting, available to our clients, including sites moved over from another host, takes a proactive approach to security and monitoring, with nightly backups, 24/7 outage monitoring, and ongoing core CMS updates.
 We've now been working with Joomla! for over ten years--since its inception in August 2005. In that 10 years, we have worked with hundreds of web sites and learned a thing or two. One of the tremendous advantages of Joomla! is the vast array of third-party extensions - components, modules and plugins - available to add almost any functionality you can think of to your web site. On occasion, a client requires functionality that cannot be provided by an existing Joomla! extension, so what do you do when Joomla! or one of those extensions doesn't do everything you need?